Starting with this one, the panel itself uses Tim Holtz Flourish stencil, embossing paste and 3 colours of Embossing powder.

The embossing paste is spread through the stencil, and you don't need to worry too much about getting it flat, as the embossing powder will hide any imperfections.
Remove the stencil, and either drop into water, or wipe it clean straight away.
 Now start sprinkling one of the powders over the paste. Tap off excess and return to the jar. Repeat with however many colours you are using. As you can see, I have three, all 'Heat it Up' brand, I've had for a while. Blue Glass, Eggplant and Lilac.
Put aside to let the embossing paste dry- mine only took an hour or so.
When it's dry heat the embossing powder with your heat gun. Be extremely careful not to touch the paste with your fingers, it gets incredibly hot.Now all that remains is to matt it and mount onto a card base.
I used a pale lilac card and some blue metallic card to matt it onto,and also scored a line across the card either side of where the panel would go. The sentiment is stamped in Versafine Majestic Blue, and comes from a Phill Martin set called Scribbled Sentiments.

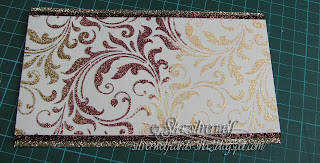
Second card uses the same stencil, but this time I used some of the Glitter Embossing paste I was gifted- incidentally, these are also from Phill Martin.
I spread the paste in rough thirds across the stencil, letting them blend & overlap where they met.

I will say you need to take care when removing this stencil, as it's flourishes can get a little stuck in the paste.
This was put aside to dry, nothing more needs to be done with it.
Just needs trimming, matting and layering. I decided to use a glitter paper for this, as I have a pack I picked up one time in Hobbycrafts which has colours very close to the embossing paste.
The pieces were matted using silicone glue so it would grip the glitter better than tape.
Now for the card blank.
I took a black card base, and scored two lines either side of where the panel would sit, then a single line either side. I mapped this out on the reverse with light pencil marks first.
For the sentiment, I used the Tim Holtz set Saying Stuff. The box comes as a separate stamp, so you can choose which of the dozen or so messages to put in it. They were both stamped in Encore Metallic Bronze and heat embossed with clear detail powder. Two star shaped copper brads were added to the panel and it was mounted using 3d foam tape.
3rd and final card of this batch, using white embossing paste and 3 colours of a sparkly embossing powder- Heat It Up's Holographic, and Stampendous Crystal and Kaleidoscope.
The stencil this time is called 'Lace', another by Tim Holtz.
After applying the paste, I randomly sprinkled the various embossing powers across the panel.
After the stencil is removed, and put aside to dry.
I like the optical illusion here, it could be black on white, or white on black. I didn't matt this one at all, but I did again score across the front of the card base.
I thought that as the panels have so much colour and texture, it needed a fairly plain base.
Layered onto the card base.

A sentiment, from Clarity, from a set called Line Sentiments No.1, stamped in Versafine Onyx Black.
Final addition was some sparkly black eyelash wool around the spine.
I'm liking this technique as a way of using up embossing powders. I have many pots of the stuff, bought back in the day when I used to do a lot of heat embossing. Not so much anymore though, so this is certainly going to help stash bust it!


