There were a lot of stages- probably more than needed, but it was a learning curve- and did come out pretty much as I was planning it to.
This was the original cover.
I wasn't a fan, but it was the only one I could find at the time, so, as I'd already made some alterations to the pages, it seemed that this was up next.
The 'envelope' for storing the cards was ridiculous- maybe I could have slid one card in there, if it was flat- so I slit the sides, added a cut down document wallet, and then glued the flap back down.

But, onto the cover. First job was a coat of white gesso, then some crumpled tissue paper over that.

I gave that time to dry, then added some texture to the surface with black stencil paste and a Sweet Poppy stencil.

Just a few patches, front & back.
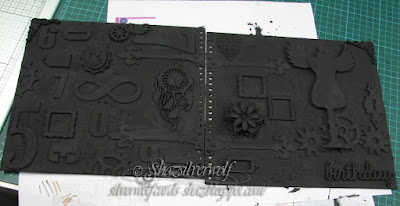
I had some metal pieces bought from a local craft shop, a whole load of wooden ones, and a bunch of die cuts. The die cuts I glued 3 or 4 pieces together to make them more dimensional.
Everything, including the covers now got a coat of black gesso.
Next I started laying out shapes on the cover.
I had the front pretty much as I wanted it, so time for the back.
I didn't want to make the back too bulky, and remembered I had some sheets of chipboard numbers, by Woodware, bought a few years ago at the NEC.
The cameo was from a pack of four bought at The Works, and sits on top of a chipboard frame.Thats the most dimensional bit on the back cover.
Added the numbers, a few cogs and a dreamcatcher to the back, then everything got another coat of black gesso.
Now to add colour, and I realised my mistake here- the sprays wouldn't show up on black! So, gave it a very rough coating of white gesso, which I forgot to photograph. I still wanted some areas of black to show, so didn't cover everything.
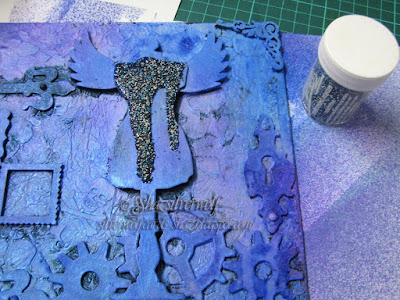
I used some Dylusions sprays in London Blue, After Midnight and Crushed Grape.

After these dried and went paler, I added some Distress Stains in Faded Jeans, Wilted Violet & Seedless Preserves.
 I realised I'd have to paint the hinges & lock again in black, as they were also coloured by the spray, and I wanted them black.
First though, I wanted to put a sweep of micro beads down the dress form, so ran some Glossy Accents down it.
I already knew which beads I wanted to use, but when I was getting them out, I spotted a jar of mixed black, blue & white ones, and decided to use them.
However, I didn't like it when it was on, the colours were wrong, so I scraped them off and went with my original plan.
A bright blue, and that looked much better. I also randomly added some to the flower petals. By the way, these 'microbeads' were dirt cheap, I picked up a couple of packs of assorted coloured ones from Poundstretcher, intended for nail art.
I've used some black Starlights paint, from Imagination crafts to re-colour the hinges on the back, then did the same on the front.
I also decided I'd hidden too much of the black base colour, so dry brushed some of the black paint into random areas. The paints have crushed Gilding Flakes in them, and have a lovely sheen to them.
I then thought I could enhance the colours a little by dry brushing on some Amethyst and Saxe Blue too.
I'd decided that it was time to stop, it looked pretty much as I wanted it to. And it was only a matter of time before I went too far.😀
 So time to put it all back together. Which is when I realised I had missed something important. I hadn't covered the insides of the cover. I'd intended to do that anyway, but now, thanks to inky painty smudges & fingerprints, it was a definite.
Quick troll through various papers and card to find something suitable, that was big enough to do both sides, especially as it is slightly wider than A4.
Came up with this, which is sort of like a very thick tissue paper.
After giving the edges a coat of black gesso, I stuck the paper down with some Aileenes TIOO glue.
While that was drying, I removed the original wire binder from the book pages. I'd left it in till now, as it kept all the pages in one place!
And on to the final assembly then.

I used four book rings in the end, and you can probably also see I applied some rub on gilding in places, both front and back.
I *might* add some photos into the little frames at a later date,and I was thinking off adding something to that wooden tag, but not sure what yet. Maybe a stamped word.


8 comments:
I love seeing your photos at each stage of your work and this mixed media journal cover turned out great! I've often wanted to try this but never seem to get the time.
Lorraine
This looks amazing Shaz. Really great work. I really enjoyed your tutorial. Barbxx
Totally amazing work Shaz, so much detail to look at and the colours are wonderful, Kate x
This is fabulous Shaz. What wonderful colours and texture.
Toni xx
Wow... love what you have created... way better than the original by far!
I watched a video of a friend doing something very similar yesterday! I just wish I had somewhere comfy to make a messy project like it. JB. Woyww
Great workspace. TFS xx Jan 52
I love that you photographed the whole journey of this covers stages. I think sometimes (the drying time kills me) makes me really not do much of this kind of a thing anymore but, I was grinning and following along through your adventure. I love that you built the colors in layers it really turned out gorgeous this way Shaz.
Post a Comment