A warm welcome to all my visitors,

Thank you for taking the time to come and look at my blog, I really do appreciate it. I would love you to leave me a comment, even if it’s just to say Hi. It means I can come visit you!

All my designs are original, so copyrighted to me. If I have been inspired by someone elses work, I have named them in the post, and where able, I have provided a link.

Please feel free to use my designs for inspiration, I just ask you to credit me, and provide a link back to my blog.

Thanks, Shaz XX

Sunday 31 January 2016

Penguin Snowglobe Christmas Cards

Another pair of Christmas cards, again using a Sweet Poppy stencil and paste, with added glitter.
The method was pretty much the same as previous ones, that is, the stencil taped down all around with low tack tape, then Black stencil paste added with a spatula.
 I removed the stencil and added Black holographic glitter to the wet paste, giving it a gentle pat the make it stick well.
 I left them overnight to dry, then next day trimmed down the image and rounded the corners. They were matted onto black card, and the corners of that rounded too. A torn sheet of Christmas backing paper, from a pad bought a few years ago added to the 6x6" card base, with some blue ink added around the edges.Mounted the images, then used peel-offs again for the greeting. And job done. I'm up to 18 cards made, I think, so I do have a few more to blog yet, and a couple or so designs in process.  But I really need to start thinking about birthdays/weddings/anniversaries and of course Valentines day, so Christmas is going on the back burner for a while. Just keeping my fingers crossed I don't lose interest in them.

Wednesday 27 January 2016

WOYWW#346

Well this weeks desk mainly revolves around why I ought to clean my desk more often!
Last week I'd been glittering some NOEL die-cuts, and today I decided I really, really needed to get rid of the stray glitter thats everywhere.
 In the process of moving stuff on my desk in order to clean, I found these, under my UFO tub, which I'll show in a minute. They are Brusho experiments, and I'd clearly stacked them up and put them under said UFO box to flatten. And promptly forgot about.


This is the UFO box, and it gets all sorts stuffed into it. Things that didn't work, or went wrong somehow, leftovers, things I'm not sure where to go next with, and so on and on.


This is just a small handful of the UFO's it holds- some things need finishing, others are there to be cut up- like the Baubles done in Gold Flake. It just didn't work, not sure why, I've had more detailed images come out fine, so I may have to try it again. But, I can punch squares out of it, and have some mosaic Christmas cards, combined with other stuff.I could get myself a whole bunch of cards done here, if I get myself doing something to finish these off.So thats going to be my project for the rest of the week, I think. See what I can make from this little lot, and empty the box a bit.
 If you're not sure what WOYWW is, then click on the button in my sidebar, and by the magic of the Internet you'll be whisked off to Julia's, at The Stamping Ground, where all will be revealed- and it's all done in the best possible taste!

Wednesday 20 January 2016

WOYWW #346

Hi folks, Wednesday again, and if you've been living under a rock somewhere for the last few years, you may not have heard of WOYWW. So hop over to Julias, at The Stamping Ground, link up and join the fun.On my desk this week are some 'will eventually be a card' projects.
 Some inked backgrounds left to dry thoroughly, so I can stamp and heat emboss over them.
 The plastic bag contains some die cuts- reindeer, 25's,Christmas Trees, some NOEL's,and some Christmas stockings. The dreamcatchers at the front I bought off E-bay.12 for £1.35, a bargain. I thought they may make some nice cards. I buy quite a few of these die cuts from E-bay, as sometimes you'd like a certain die cut, but know that you would not get enough use from it to justify the purchase, if you know what I mean?
I had just moved these off the desk, so they could dry out. I'd cut them out using the Sizzix Alterations NOEL die- which seems to be discontinued now-and I thought a few of them might look good glittered.
 So we'll see where that goes. I'm still on a roll with my Christmas cards- though I'm only going to post up one a month now- but while I've got the flow I'm going to run with it. I'll run out of steam eventually, hopefully I'll have most of them done by the time that happens.Have a good day, I'll see you all later.

Friday 15 January 2016

Holly Wreath Christmas Cards


Right then, just a couple of versions of this card, then I'll give the Christmas Card posts a break for a while.  The Holly Wreath is a Sweet Poppy stencil, and I did two versions, on black card and on white.


You can see the holly looks a little variegated, and that came about quite by accident.


I used white stencil paste, and a dark green glitter to start with, on the white card.


I maybe should have patted the glitter down a little harder at this stage, as after it had dried, and I was brushing off the excess to reduce the shedding, I ended up with quite a few white patches. Which led me to a couple of solutions.


Firstly, for the next card I coloured my white stencil paste with a green re-inker. Be very sparing with the ink you add- you don't want to make your stencil paste too runny. So try to pick a reinker close to the colour you want, rather than the usual method of starting light and adding ink to get darker.


Have a tub with a lid handy to save any excess paste in too.


 I also decided to patch up the bare spaces using Indigo Blu's Flitter Glu through the original stencil.

 Using a small piece of Cut'n'Dry foam to add the glue.


I re- attached the stencil, then worked my way around the bare patches.


Then I added a brighter shade of green glitter than I used the first time.


As you can see, there are lots of places for holly berries, and this was where I used up most of my red acrylic gems.
I used a mix of 3mm and 4mm ones.


There is also no greeting in this stencil, and I solved this by using a green marker to colour some silver Christmas Peel-offs. I'll get down them one way or another!

This was the wreaths on black card after a touch up.


Final addition was a torn corner of Christmas Paper- something else I have way too much of- and a little green ink sponged around the edge.The image was matted onto black card, both had their corners rounded, then mounted onto a 5x5 card base.

Wednesday 13 January 2016

WOYWW #345

Having a break from Christmas cards, finding it very strange I haven't got fed up with them yet. The last two designs are posted below this, and I still have a couple more designs to blog, and a few more in my head. Today being the day we all link up at Julias, at The Stamping Ground, to show the state of our desks and workspaces.
And this is mine,the large pink eggs at the front, courtesy of FB enabling by our own Julia! She said you could get these in Home Bargains for 99p each, so after asking Beloved Hubby nicely, it got combined with a little shopping trip to get some.A bit pink for my liking, but I'm sure once they've got some ink on them, they'll be fine. Which is what they are for, if you haven't seen them before. They make sponging inks really easy, with no risk of hard lines, due to the shape.
Behind them, my reading glasses.The photo album actually contains metal stencils, mainly my Sweet Poppy ones. Past that, you can see the makings of another couple of Christmas card designs. The acrylic gems are still in their little packets- I now need to have a look online for the clear plastic containers I have my others in, as there is no room for them. Behind them, a penguin, and he was a Christmas present from my Grandchildren. He has a little solar panel in the back of his head, so his eyes will light up When we get enough sun to charge him up, lol.Beyond that, it's just a general collection of 'stuff'- postage stamps/scalpels/odds and ends, you know the drill.So thats me, not too bad for once, I must admit.
Anyone else been keeping an eye on whats coming soon from CHA 2016? From what I've seen from Tim so far, this release is going to get expensive,lol. Mini Crazy Birds, and dies, a white Distress pad, some great mediums, and a lot of great stamps.  The only thing that doesn't grab me is the 4-way Archival pad. Most of my stamps are too big to make it practical.
Have a good Wednesday all, I'll be around later.

Sunday 10 January 2016

Visible Image Christmas Cards (2)

Two more Christmas cards using Visible Image stamps, actually 4 cards, as I made two in each colourway.
This one came about whilst I was putting away some white card scraps, and came across the white pearlescent strips that I've used here. I've used this basic design of resist embossing before, and it seemed like a good way to get at least 4 off-cuts out of the way.


 I began by stamping randomly the Christmas Words stamp and then coating with White embossing powder. My powder  of choice is the WOW! Embossing Powders Opaque Detail White, as it really is a proper white. I used Versamark ink for the stamping, and the pad I was using was the Versamark Dazzles pad in Frost. Yes, I fell for the hype when they came out, but frankly, I really don't see any difference between them and the original, so I just use any.
Heat set, then added Some imprints of the Merry Christmas and a  Happy New Year stamp.


I heat set these, then just roughly masked those areas with Post-Its, so I could stamp various sizes of the Snowflake Set.


When I decided I had enough stamping on there, I took a selection of Distress Inks in blues and purples for one set, and reds and greens for the second.


 I used Broken China, Tumbled Glass and Mermaid Lagoon blues, Shaded Lilac and Dusty Concord purples. The Reds were Fired Brick and Festive Berries, the greens Peeled Paint and Mowed Lawn. I gave them all a buff up with a piece of kitchen towel to take any ink off the embossing.


My card bases for these were A4 sheets of Pearlescent white card, scored and folded in half. I also wanted to create a little extra textural interest by having an embossed line down either side of my stamped and inked strip. For this, I simply lay my strip on the INSIDE of the front of the card, and made a faint line either side of it. Then I lay the card base on my scoring board, in this case the Hougie, as it has more lines to choose from.


I scored down the lines nearest to my mark, in both cases just outside my pencil line to give me room to place the strip on the outside.


The strip was attached with dst, and the Sentiment stamped in Memento Bamboo Stalk ink on the red/green combo.
The strips were longer than the card, so I trimmed off the excess and put to one side, as I have a way to use these too.


The blue/purple combo had the sentiment stamped in Archival Ink Cobalt Blue. The green one wasn't stamped in Archival, as I realised I don't have a green or red Archival pad. But Memento works just as well for clear imprint/drying time etc.


With the stamped strip and sentiment in place, it sort of seemed like it still needed something. Then I remembered this die set I was enabled into by a WOYWWer!


6 different sizes of snowflake, and all different. I wasn't sure which I wanted to use, but the largest flake was definitely too big, so I cut out the 3 middle sized ones a few times. Glad I cut out more than I needed, as the extras came in useful on the first VI card I posted below.


In the end I used one of each of the snowflakes on each card, using a Zig glue pen to attach them, and placing an acrylic block on top to make sure they stuck.
Final touch was the addition of some clear acrylic gems in the centre of the snowflakes, and around the greeting.


So I'm now up to 8 cards blogged, and I still have a few more to show and tell.

Card Recipe:
 A4 sheet of Pearlescent white card
Strip of pearlescent white card
 Stamps: Christmas Words, Snowflake set and Christmas Greeting
Die cut snowflakes,3 sizes
Acrylic gems
Distress ( or other Dye ink) in blues, purples, reds and greens
 Versamark, or other clear embossing ink.
 WOW! opaque white embossing powder

Friday 8 January 2016

Visible Image Christmas Cards (1)

So, I appear to be getting ahead of myself this year. Christmas Cards. In January. And no, they are not late for last year! I had a thought that perhaps I get so fed up with making Christmas cards because I tend to use 2 designs every year, One for family and close friends, and a smaller one for work colleagues and acquaintances. I nearly always wait until the NEC Hobbycrafts in November, in case I find a design or stamp I really like. Despite me having a ludicrous number of Christmas stamps.And saying every year I'm not going to buy any more. Yeah, right.
I'm in to January and the Christmas stuff is still out, and armed with my plan to make 4 or 6 maximum of any design, it seems to be working. In this last week, I've made a total of 18 cards, which I will blog over the next few days. First ones up to be blogged are the first set of  cards made with some Visible Image stamps. Tomorrow I'll blog the second set.
The hardest part of these cards has been getting a photo that showed the sparkle from the Glamour Dust!


 I will say right at the start that the Christmas Words stamp AND the Snowy Scene stamp are now discontinued, but there are many similar types of stamp to be found.


The card bases are the pre-scored type available from a number of places, the only issue I had with them is that the label says they are 7"x7". As you will see later, it became clear that  this is not the case.
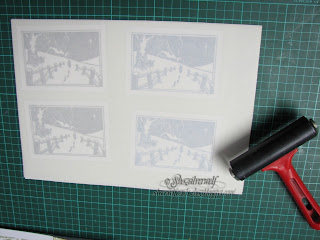
 My first step was stamping the Snowy Scene onto White Pearl card. I used Versafine Ink in Onyx Black and  Majestic Blue, stamping 2 of each. Then I laid over them a sheet of Double Sided Adhesive , from Stix2. I used an old brayer I keep for this sort of thing to make sure it was stuck down well with no air pockets.
Tip here: When you come to put down your adhesive sheet, DO NOT peel the covering layer off completely. Just peel it back an inch or so, and stick that edge to the edge of your card. Then slowly pull back the backing, smoothing it down as you go.
 Now you have your adhesive sheet down, cut the images down to size, either with a knife & ruler, or your cutting system. This way you only put Glamour Dust on your image, and not waste it on scrap you will cut off and throw.

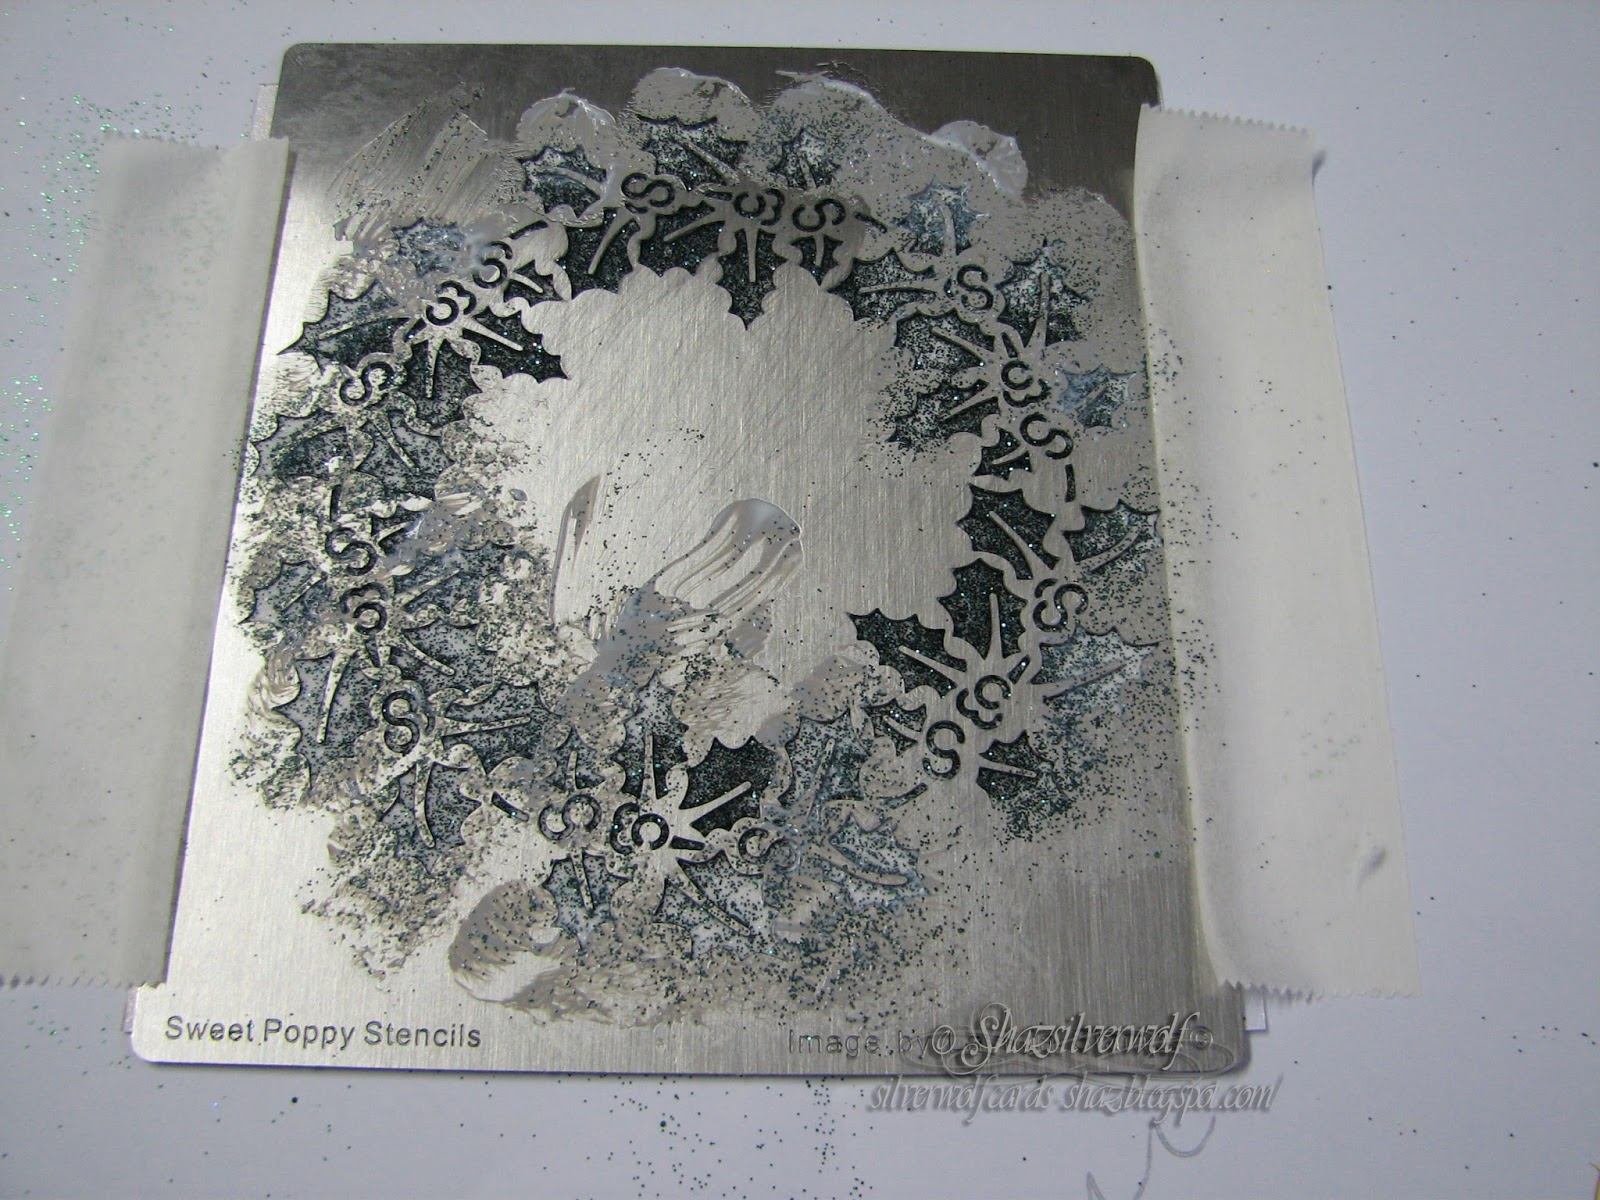
Next,peel off the cover sheet on your image, place on a sheet of scrap paper, and sprinkle with Glamour Dust. I advise burnishing well with your fingers, to make sure the image is covered, and also that when you tip away the excess, what is left on the image will not shed.
Now I have all four images trimmed and coated with Glamour Dust,I matt them onto corresponding colour card and they get put to one side whilst I make the Christmas Words backing.


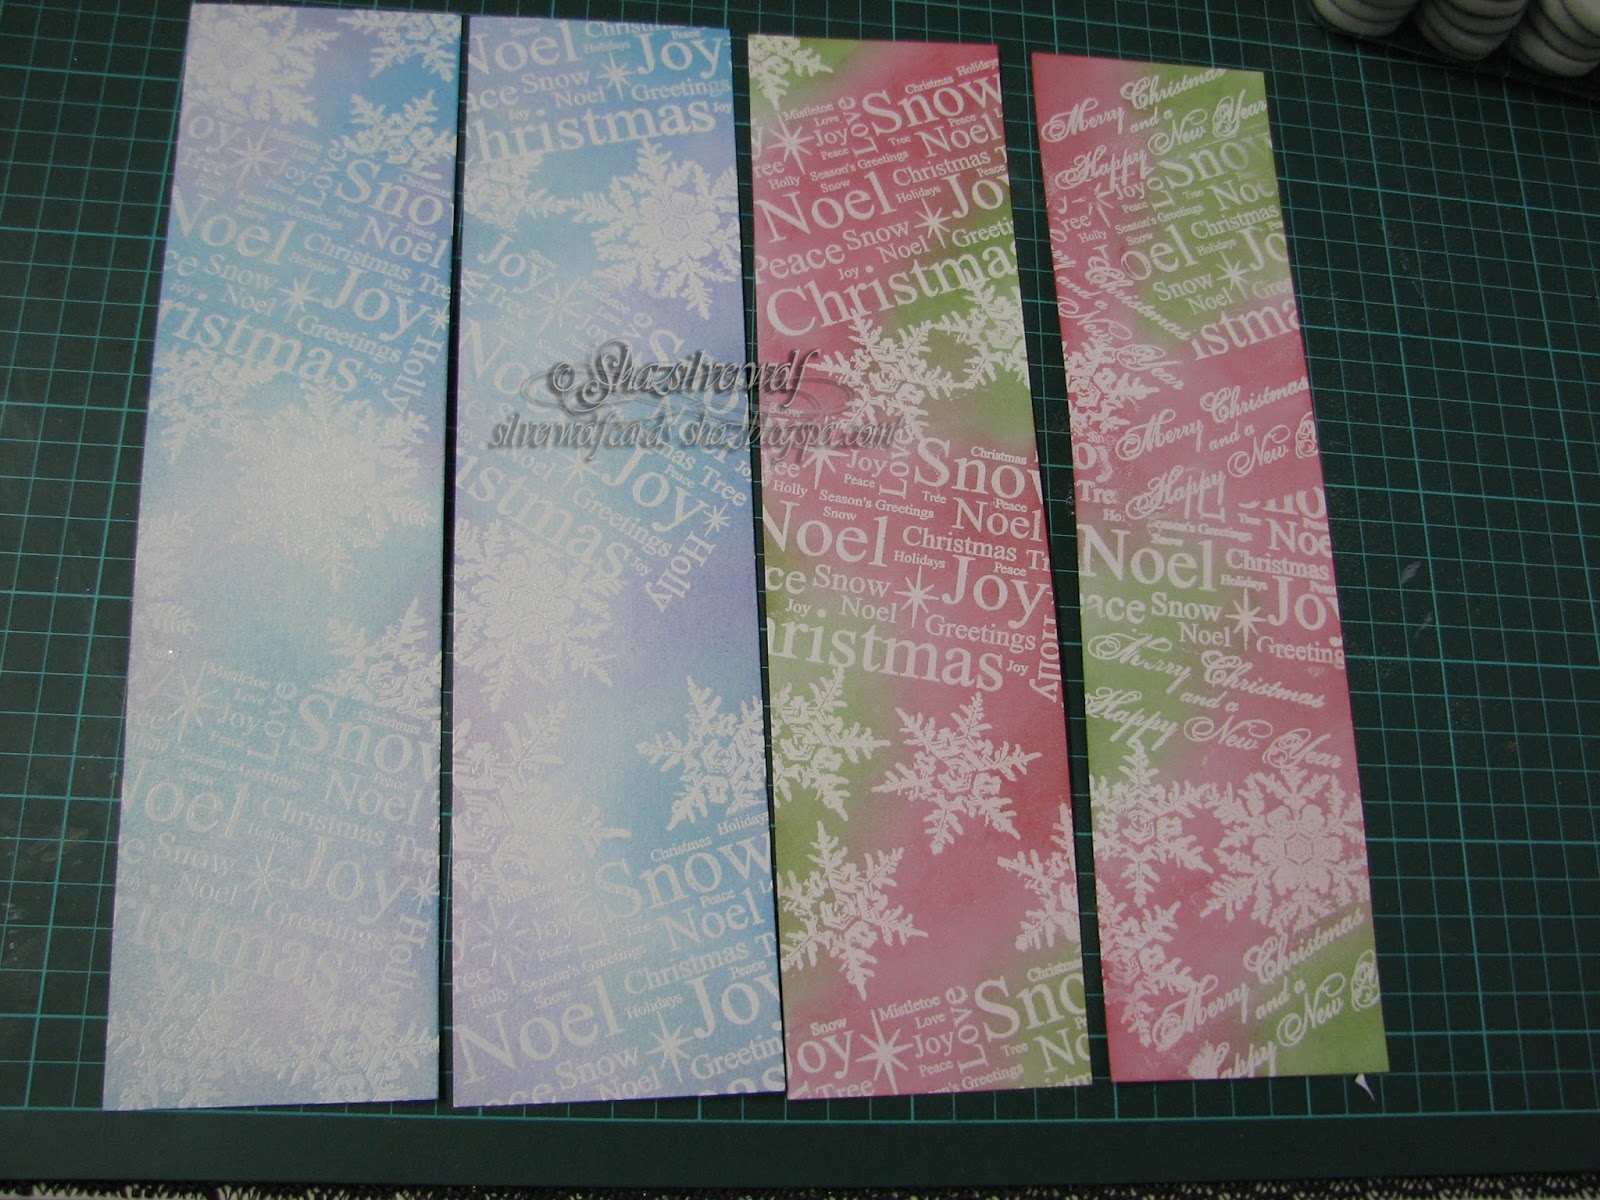
Using the same Versafine Inkpads, and two more sheets of Pearl card, I stamp up the backgrounds. No Stamp positioner needed for this step, it's easy to do by eye with a clear stamp. If  I was using a Rubber stamp, a Stamp Positioner may be a good idea, to make sure you don't leave any gaps.

Two sheets finished, and before attempting any trimming/cutting, give it a blast with your heat gun, as the Versafine takes a while to dry on the Pearlescent card, so it smudges easily. Guess how I figured that one out?


My next step was to cut the background down to size, and believing my card bases to be 7"x7", I cut 4 of each colour in 3 1/2" squares.Then I ran around the edges with the corresponding ink pad.


 As you can see, my pieces didn't fit.The corners at the centre should have just butted up to each other, not overlapped. So I had to cut a little off one corner to keep it flat.


 Good job I tried out a 'dry fit' first.


 I double checked my measuring, and yes my pieces were the right size. Checked the packaging on the card pack, and yes, 7"x7".


So I measured the actual card. Not 7"x7" at all it turns out. 6 3/4" square it seems.
Which is why my pieces wouldn't fit. I would have been really annoyed if I hadn't been covering up the centre  with the focal image.


I assume that the cards have been subjected to conversion to metric sizing, and the packaging doesn't reflect that, as when measured with a metric ruler, they are 170mm.


Anyway, back to the cards. All four have the words background stuck down with double sided tape.The focal image  is added with foam pads, to raise it slightly. I stamped the Merry Christmas greeting in the lower right corner in matching ink. This greeting by the way, is usually all on one line, but I needed it to have the Merry above the Christmas to fit, so I just snipped between the two words.I could have done it by masking off the word I didn't want with tape, but this way was quicker and easier. Final addition, just for balance, were a couple of snowflakes from the Creative Expressions Sue Wilson Snowflakes set of dies.I stuck these down with a Zig Glue pen, and lay them down with an acrylic block on top to make sure they stuck.
 So that's my first four cards completed!


Card Recipe:
 Visible Image stamps, Merry Christmas, Snowy Scene and Christmas Words
 Card base, 7x7.
3 sheets of pearlescent card.
Versafine in Black and Majestic Blue
Pieces of black & blue cardstock to matt image onto
Glamour Dust
Stix2 adhesive sheet
Sue Wilson Snowflake die set.
Double sided tape and foam pads.


Wednesday 6 January 2016

WOYWW #344

Happy New Year to everyone, and lets hope it's full of all the good things we'd wish each other. First WOYWW of the year, and here's my offering:
Not a total mess, I'd obviously just swept a load of bits into the bin. The surprising thing really should be the amount of Christmas stuff still on my desk. I have to admit that normally all my Christmas stuff is long since cleared away, me being sick of the sight of it by now. But this year that hasn't happened, and I've been getting ideas for Christmas cards  popping into my head. Which may be because I decided definitely there will be no mass production of the same design this year- I think thats what really bores me. Plus, by making 4 or 6 of a design, I can use a lot more stamps than usually see ink. So thats what I've been doing, and later in the week I'll start blogging the cards I've made.
This is what was in two of the padded envelopes you can see in the picture. Whilst making a couple of the cards, I used up almost all of my red flatback gems, (holly berries) and I discovered I had no dark orange/coppery coloured ones, so I ordered 3mm and 4mm sizes of dark red, dark orange and a golden brown. I added a haematite/pewter colour too, as I don't have any black that are fairly sparkly. I have some black, but not as much sparkle as these.Right, time to get yourself over to our lovely Julias, at The Stamping Ground, and link yourself if you haven't already. See you later folks.

An End of an era

An end of an era

I write this with a broken heart, that only time can heal My beautiful, wonderful wifelet Shaz (Silverwolf) passed away peacefully in the ea...