A warm welcome to all my visitors,

Thank you for taking the time to come and look at my blog, I really do appreciate it. I would love you to leave me a comment, even if it’s just to say Hi. It means I can come visit you!

All my designs are original, so copyrighted to me. If I have been inspired by someone elses work, I have named them in the post, and where able, I have provided a link.

Please feel free to use my designs for inspiration, I just ask you to credit me, and provide a link back to my blog.

Thanks, Shaz XX

Thursday 29 March 2012

Ruby Anniversary Easel card

Had some some fun playing with new dies I bought this week: the Tim Holtz Tattered Florals,Movers & Shapers Tattered Florals,Elegant Flourish, and Memory Box La Rue Heart.  I had seen so many good things done with the Tim Holtz dies, and they are so much fun to work with.
 The Lattice 40 was a design I found on UKScrappers, for the Silhouette, posted by a lady called Neries, and her name links to the page it is posted on. I cut it from dark red paper, than layered it onto a pale gold paper.
 The Gold Anniversary backing paper, and the White Congratulations paper are both by Craft Creations, and come in a range of colours with gold or silver foiled print.
  The La Rue heart was cut from the same pale gold paper, and matted onto a heart cut from the dark red paper. I loved the elegant filigree design of the heart, and there is also a heart die that cuts out the block shape. I didn't get that one, I just cut around the outside of the filigree design when it was stuck down, but the die would be useful, I think. I mounted the heart with sticky tabs, using one layer at the front and two layers at the back to give it a little dimension.


I cut out a selection of flowers and flourishes in various card and paper , and curled the petals with the handle of a small paintbrush, then used an embossing stylus in the centres to give them all some shape.


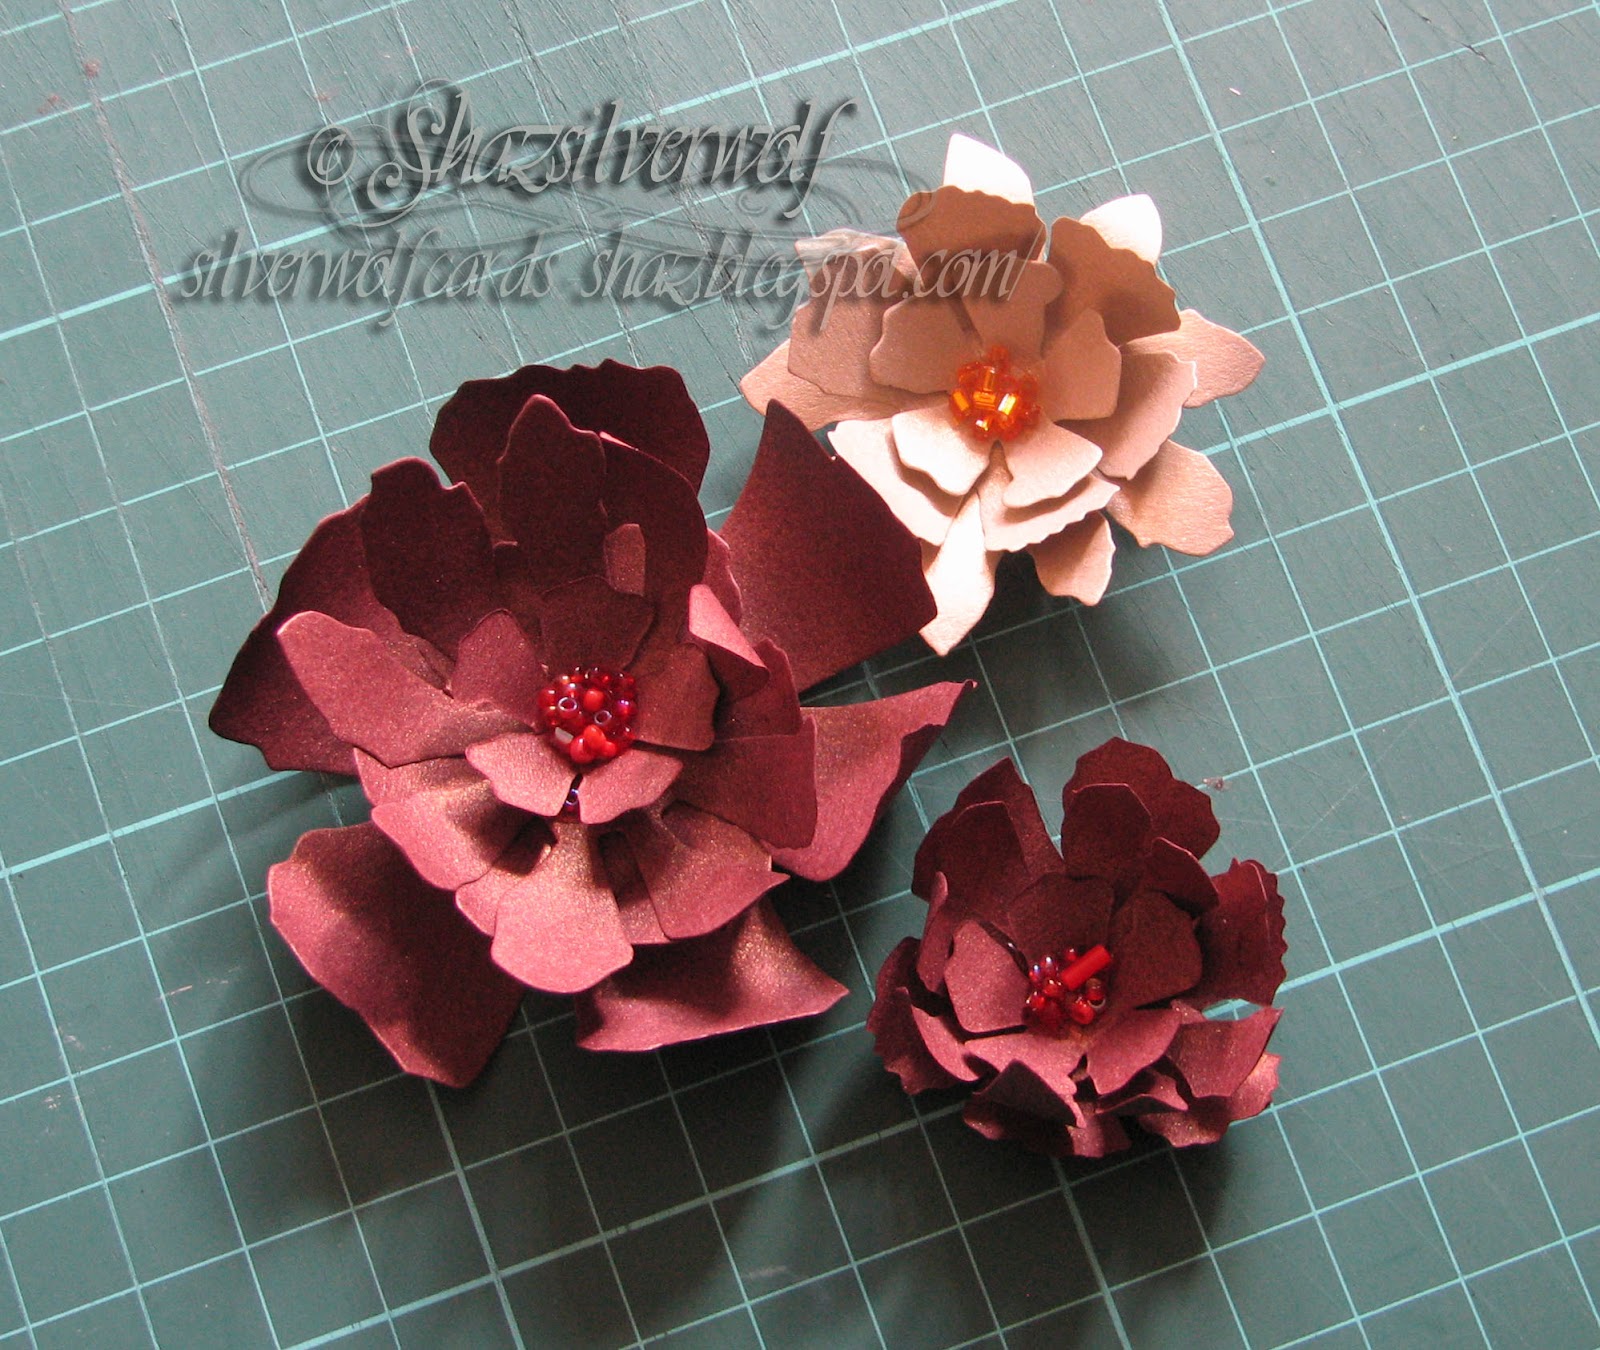
 The layers of petals were stacked up using silicone glue.
The addition of same small seed beads to the centres, with Glossy Accents, finished them off nicely.
 The 40 was added with sticky pads, and then some Burgundy acrylic hearts on to this with a tiny spot of silicone glue. I used silicone glue again to mount the flowers, along with some short pieces of gold & burgundy ribbon. I tucked the two Elegant Flourishes in behind the flowers.


Wednesday 21 March 2012

WOYWW #146


Hi everyone, been MIA for a few weeks- wrapped up in Wedding Stationery, and work. I've really missed joining the weekly workdesk wander, at the Incredible Julia Dunnits,so here I am again. Back on afternoon shift now, so have some more time (at last). I can go to bed when I want, get up when I am ready, and still get stuff done. Right now I am making a wedding card for someone at work who's getting married, I have a mug of coffee by my side, and Disturbed blasting from my PC- all is right with my world! :)
This engagement card was made for some friends, really simple, just a ribbon threaded through a Diamanté heart buckle, wrapped around a square of white card, matted onto another square of white, then navy to match the ribbon. Stamped the Congratulations in Distress Stormy Sky and heat embossed it with clear powder and matted onto a navy strip.


 This is the start of a Christening card for a little girl, using a Creative Expressions medallion stamp I've used for this before.
Been bargain finding again- I've wanted the Raven stamp from Jennie at The Artistic Stamper for a while, and she had a fab sale on Feb 29th, so I took advantage of her generosity, lol. Got some embellishment bits as well, I'll find those again and post a pic.
 The Halloween stamps are from Chocolate Baroque, I don't have any Halloween stamps, and these were a great buy. The little wood mounted Alphabets you can see were probably my best buy to date- we went to Kidderminster recently, as Beloved Husband wanted to go to PC World, and they have a store called The Range there, which has quite a big craft section. These stamps were in their reduced bin, 99p a set! I also got the other two for 99p each, a 'With Sympathy' stamp, and one that reads Thank You in scrabble tiles. The rosettes are done in a sparkly vellum, for the previously mentioned Wedding card, and to everyone who suggested it last time, a glue gun works great, thanks folks.


Last couple of pics, from my youngest son for Mothers Day, a Simons Cat pillow. On my pc desk, there are two Simons Cats, one each from Son & Hubby for Christmas, a Charlie Brown,as I am also a massive Snoopy fan, and sitting next to CB is Boris the Bat, a pressie from Beloved Husband. The tiny little white clay teddy was made by my Daughter in Law Becky a few years ago.


 So thats my little corner of the world today, hope you are all having a great Wednesday, see as many of you as I can get to over the next few days.

Sunday 18 March 2012

Some of my favourite stamp plates.....

Mystic Dreams,72C
This is just a little follow on from the post below, I think the 'Mystic Dreams' plate from Non Sequiteur is gorgeous, and  thought I would share a few other plates I have of theirs with you. These are mainly pagan/celtic/mystic images, perfect for those who want something a little different, or who have friends & relatives these images would suit. I have made the title under each stamp set a clickable link, so they will take you straight to the plate on De Stempelwinkels site. This link will take you to Non Sequiteurs site, where you can view all the plates,as well as the individual images.

Celtic Mythology,75C


Winter Solstice, 71C.


Water myths & Fantasy, 53C


Forest fantasy, 90
Enchanted Forest, 91


Faeries & Flowers, 95
                                                                                                                                                                               
Samurai plate, 67
This one has some lovely 'different' Christmas stamps.
Winter Holidays, 64C


This one features the Butterfly Screen I have used on cards before.

Massive apologies if I have caused anyone to go and spend more money, :) - I know I could spend a fortune there if I didn't retsrain myself!

Mystic Moon(light)

  Here is the second of my DT pieces for Craft a Scene's March challenge, Moonlight.
It uses a couple of Stampscapes stamps, and a couple from Non Sequiteur.
The background is also a little different this time, created using oil pastels. If you go to this page, you will find instructions on how I did this. Its a really simple technique, but can produce some interesting results. The important thing is that you will have to stamp in Staz-on, or it will wipe off, Versafine will work, but you need to spray with a sealant to make it permanent, I use cheap hairspray.
I created the background on white pearl card, an A5 piece,leaving a white area where I was going to place the moon. The oil pastels I used were a mix of blues with a little black for the night sky, browns in the centre for the mountains, another layer of blue where the lake would be, then greens for the foreground.
     Another bonus with the oil pastels is that when you have your images stamped, if areas are too dark, or just to make  areas of light & shade, you can remove some colour using tissue/kitchen paper/cotton buds.I did this in the water area to simulate the reflected moon.
The first image I stamped was the mountains, Rocky Peaks,188F, roughly in the middle of the background. Next I added the Cloud with Crescent Moon Lge, 202G, placing the moon in the white area. A Stamp Positioner helps here.
72C, Mystic Dreams
At the base of the Rocky Peaks I stamped Lakeside Cove Lge, 049G. To finish the scene, I used a stamp of Standing Stones, from Non Sequiteur plate 72C, Mystic Dreams. These stamps are now available from De Stempelwinkel. You can see the full range of images here, at Non Sequiteur,. They have some fabulous stamps, images you won't find anywhere else, all u/m.
 Finally, some white gel pen was added to give highlighted areas. I trimmed the image down, then matted onto black, then silver card. Before mounting onto the front of a Black base card, I stamped the words MYSTIC MOON, also from the Mystic Dreams plate, in Silver Encore pigment ink, added Silver Detail embossing powder, and Heat embossed. Then I mounted the image above it.
 So, to recap what you will need:
Stampscapes stamps
 188F, Rocky Peaks
202G Cloud with Crescent  Moon
049G Lakeside Cove

Non Sequiteur stamps
72C Mystic Dreams

Oil Pastels
White pearl card
Black card
Silver card
Black Staz-on
White gel pen
Silver pigment inkpad
Silver Detail embossing powder
Heat gun

Tuesday 13 March 2012

Party Time

 Another card from the Penny Black 'Love London' stamp set for the J&C Creations DT. When I saw this image, it instantly said Party Invitation to me. With so many people being certain to have Street Parties for this years Jubilee, I think this image will get a lot of use.
 The image itself was stamped in Memento Tuxedo Black onto white card, then cut out using Nestabilities Petite Scalloped Ovals, S4-139. I used the second to largest die, then used the largest to cut out another oval from Red Glitter card, and one from Tim Holtz Core'dinations blue paper.
The blue oval was cut roughly in half from the bottom left to the top right.
 The image was coloured with Promarkers, and I used a pale grey to add a little 'ground' for them to run on.The 'You're Invited' sentiment was one from an Octagonal wood block I bought at the NEC years ago, and is also stamped in Memento black.   I added the blue half oval to the back of the image with a little DST, then used some silicone glue spotted on the back of the image to matt the whole thing to the red glitter card. Silicone glue is ideal for this, as it will stick to the rough surface of glitter without a problem.
My base card is in topfold format, and I added a strip of red ribbon to the top, and a strip of the blue dotty ribbon along the bottom, then added the image panel in the centre with foam dots.
So, to recap, you need:


Love London stamp Set
 Tuxedo Black Memento inkpad
Promarkers- Red, Blues,Greens,Browns & Greys
Red glitter card
Red & Blue Ribbon
Blue Tim Holtz Distressed Paper
Nestabilities  Petite Scalloped Ovals, S4-139
‘You’re Invited’ stamp

Westminster Abbey card

 This is another great stamp from Penny Black, this time a wood-mounted,4226L, Westminster Abbey. 
 I thought immediately that it would make a lovely Wedding card.
 I used a base  of white pearlescent card, A4 folded to A5.
TIP: If you fold A4 to make A5 cards, trim a little off the top or bottom before you begin to construct your card. Used as is, it will be a very tight fit into the envelope, and if it has any layers or dimension, it will not fit.
 The Abbey image was stamped in Adirondack Espresso onto a scrap of white pearl card, and cut out using Nestabilities Labels 8, with the  2nd from largest die. I used the largest die to cut out the dark blue mat from dark blue card.
 Next I used a small very slightly damp paintbrush to drag some of the Espresso ink into the image. You can use a waterbrush too, just don't let too much water reach the tip.
TIP: Keep your brush only slightly damp, and scrub it off onto scrap paper regularly. You will pick up ink on the brush, and end up dragging too much colour into the image. And yes, I found that out the hard way, lol.
 I sponged a little Adirondack 'Meadow' at the bottom to give a foliage impression, and some 'Stonewashed' in the sky area.
 The image was matted onto the blue card with DST.
 I tore a strip of Tim Holtz Core'dinations paper in blue and added it to the left of the card, and some glittery vellum on top. If you don't have glittery vellum, you can do your own by stamping a swirly or flowery image onto plain vellum with clear embossing ink, and heat embossing with a sparkly embossing powder. The blue spotted ribbon was tied in a knot over both, then the image mounted overlapping this with Pop-Up glue dots. I used a 'Wedding Day' worded stamp along the opening edge, stamped in Distress Ink Cracked Sapphire,  placed equally, and added some dots in a matching Promarker to finish.
 This is another DT project for J&C Creations, and the Stamp, ribbon, Distress Inkpads and Tim Holtz paper are all available from J & C Creations.

To recap, you need:
 Penny Black Westminster Abbey stamp
Adirondack inkpads in Espresso, Stonewashed & Meadow
Distress inkpad Cracked Sapphire
White Pearl Card
Dark blue card scrap
Tim Holtz Core'dinations blue paper
Glittery Vellum
Blue & White Spotted Ribbon.
Nestabilities Labels 8
Small paintbrush or Waterbrush

Monday 12 March 2012

Window Hanging Suncatcher

This was created for the J&C Creations team, using the Penny Black 'Love London' transparent stamp set.


 The images were stamped onto acetate (I used inkjet film), using Black Stazon. I let it dry for a moment or two, then turned it over and coloured on the reverse using Promarkers in reds and blues, with some browns/golds/oranges for the characters.Because you are colouring on the opposite side to the stamping, you don't get a problem with the Staz-on bleeding.
 The markers don't blend in the same way on the film as they do on paper, but you get nice jewel bright colours.
 The images were cut out, and I punched holes and added eyelets for hanging. I put two in the top if the bus, and one in the bottom, 1 each side of the 'Underground' sign and one each in the top of the bags. I used 34 gauge wire, which is thin enough to be able to thread through the beads, but firm enough that you can use the wire itself to pick up & thread the beads. I alternated red, white & blue beads to keep to the theme. As you can see, the wire is thin enough to be able to thread two strands through the beads, as I did at the top of the bus to make the hanging string, then I separated them out again to make the loop. I added a large blue bead at the top that I glued the ends into.


Not the best shot, and yes, my windows do need cleaning, lol.

Saturday 3 March 2012

Moonlight.....

Wow, into March already. Time is flying past, it seems.
We had some fabulous entries in last months Craft A Scene challenge, which was 'A Winter Scene', and I believe the winning entries will be posted up this weekend.
So now onto this months Challenge, which is 'Moonlight'.
For the first of my two pieces this month, I have used images from Lavinia Stamps, Stampscapes, and Inkylicious.

 The Lavinia Stamps are:
Moon Fairy
Bamboo( Bottom Left)
Fairy House

The Inkylicious are:
Grasses
Willow (Bottom Right)

The Stampscapes are:
Oak Branch, 203G and
Spooky Branch 273G.

This piece sort of grew of its own accord as I worked on it, and  I wasn't entirely sure what I would do with this when it was done, but when I got to the end, I realised I had made our Granddaughters Birthday present!
  She loves fairies, and this will go in a frame for her bedroom.
The piece of card is A5 in size, 5 3/4 x 8 1/4. I brayered the background firstly with Adirondack dye inks, starting with Cool Peri. I followed this with Shell Pink,Stonewashed,Purple Twilight and Eggplant. The 'tunnel' effect was achieved by keep turning the card so that I brayered all four sides, and tried to come in a little further at the corners by brayering across the corner. All the images were stamped in Memento Tuxedo Black, starting with the Moon Fairy. Next came the Fairy House, then I added the grasses along the bottom edge, Willow in the right corner and Bamboo in the left. The 2 oak branches and the Spooky Branches were all positioned using the Stamp Positioner, so that I could get the orientation right.
The moon was given a little colour with Antique White Flexmarker, and I used Promarkers in browns, reds and greens to colour the Fairy House. I added a little colour to her wings with a Glitter Sakura Gelly Roll pen, and also the dots around the moon. I dotted a glue pen between the Moon Fairy & the Fairy House, then sprinkled some crystal glitter over it. That doesn't show up too well, to be honest, and I shall add some more dots of Stickles over the top, before I frame it. Then I just trimmed the edges to neaten it, and matted it onto some black cardstock.
You can probably see that I tend to work on top of an A3 pad, the sort you can buy for children as a sketch pad. It makes it easy to take the ink off your brayer, test stamp images, stamp off onto, and sometimes you end up with a really interesting masterboard style piece, quite by accident!
   So thats my first this month, pop over to Craft A Scene tomorrow and you will see all the DT first pieces, as well as the winners from last month.


An End of an era

An end of an era

I write this with a broken heart, that only time can heal My beautiful, wonderful wifelet Shaz (Silverwolf) passed away peacefully in the ea...