A warm welcome to all my visitors,

Thank you for taking the time to come and look at my blog, I really do appreciate it. I would love you to leave me a comment, even if it’s just to say Hi. It means I can come visit you!

All my designs are original, so copyrighted to me. If I have been inspired by someone elses work, I have named them in the post, and where able, I have provided a link.

Please feel free to use my designs for inspiration, I just ask you to credit me, and provide a link back to my blog.

Thanks, Shaz XX

Saturday 18 February 2012

Craft a Scene- A Winters Tag

Well, this is my second post for the DT challenge this month.
 I remembered seeing an interesting piece on Kevins Stampscapes site a while ago, so I went and had another look at it, and I thought it would work well for this challenge.

You can see Kevins original tutorial here, called 'Winter Flurry'.


What Kevin did was to use a piece of pearlescent card as his base card, and streaked on colour using a stylus tool. He used Marvy inks, which I don't have, and I have not really got a good technique yet with the stylus  tool, so I streaked ink direct from my inkpads onto an A5 sheet of pale blue pearlescent card.
    First colour was an Ancient Page inkpad called Flannel- a mid grey colour. I dragged this across the cardstock in a few places, lightly.
 I followed this with Stonewashed & Denim Adirondack ink, and then Weathered Wood Distress ink. You can see that I haven't bothered about completely covering the cardstock, and because its a pale blue, you get a lovely shimmer to the rocks & snow.
Next I watered down a little White Acrylic paint, and used an old toothbrush to flick this across the inked cardstock. 
 I used only one stamp, Pines & Rocks, 195G, which I stamped in Versafine Onyx Black, varying the height of the image, and also using a 'second imprint' sometimes, for depth.
 Once the image was dry, I used a white gel pen to add snow detail to the trees and some of the rocks.
A while ago I made myself a tag template out of acetate, and I used this to select the area of the image I wanted for my tag.
  Once it was cut out, I punched a hole in the top and threaded some fibres through, in colours to blend with the tag. Two silver star brads finished it off. As you can see from the second picture, you could get at least three tags from an A5 sheet- perfect for multiple cards!
 By the way, for my fibres I use fancy knitting wool- you can find balls of this really cheaply, in all sorts of colours and types, and one ball will probably last a lifetime! Great idea is to share with friends- they buy one colour & you buy another, then split them.
  Thanks to everyone who commented on my first piece, I am glad so many of you liked it.
   I hope this one shows that you can get really cool results with the minimum of stamps & ink, and that you can always substitute what you already have for what someone else has used, and still get a good result.
 Quick recap then:
Pale blue pearlescent card (white would work too)
Mid grey dye ink
 3 shades of blue ink.
Black Versafine, Memento or Archival ink.
White acrylic paint.
Cheap toothbrush.
Stamp (195G Rocks & Pines)
Fibres & Brads.


Thursday 16 February 2012

Valentines Card

This was the card made for my Beloved Husband this year.I used the Black & Burgundy theme from our Wedding, and the card also incorporates some of the ribbon used in the Invitations, as I have plenty left!
 The base card is white Pearlescent, from PDA Card & Craft, which is where I buy the majority of my cardstock from. Good prices, excellent quality & choice and fast order turnaround, so whats not to like?
 The ornate background was stamped in Encore Gold Pigment ink onto black pearlescent paper, and heat embossed with Gold detail powder. The stamp itself is called Large Swirl Frame Background, by Magenta, 26019-R.


This was matted onto white pearl card, then black card. Some Burgundy ribbon was tied around the left hand side, and tied in a bow. Then I mounted the panel onto the card blank, which was cut down to a square.

For the tag, I used some dark red leather effect paper. Its a roll I have had for a while, I bought it from Hobbycrafts at the NEC a couple of years ago. I used this to cover a plain white tag, and trimmed it down.

Next I added Distress Ink in Aged Mahogany to colour the white edges of the tag, and to swipe over the texture of the paper too.
I punched a hole in the top of the tag next,then used a hole re-inforcer, coloured Black with a Promarker, to finish it off. I also used the Promarker to colour inside the hole, to hide the white edge.
 I got these from Wilkinsons, by the way. I thought they'd finish off  tags I cut myself tags nicely.


Now I selected some Black & Burgundy paper flowers (Craft Creations),and cut the heads off the stems. I used the Black Promarker again to colour the green leaves black.


A dollop of silicone glue next, and some small pieces of ribbon pressed into it, then the flower heads on top of them.

The Black & White heart  is I believe, a freebie from Craft Stamper some time ago. I stamped it in Versafine Onyx Black onto a scrap of the pearl white card, then added a couple of layers of UTEE. I put an acrylic block on it overnight to flatten it, after the UTEE had cooled down. I added it to the tag with some more silicone glue, so I could angle it slightly. A small length of black organza ribbon threaded through the tag, then finally I added it to the front of the card with some sticky tabs for dimension.

Wednesday 15 February 2012

WOYWW #141


 Its Wednesday!!!!

Good WOYWW morning folks! This is what was on my desk last night when I took the piccy. It also goes to show that despite what my pictures usually look like, I do NOT do Tidy, lol. You can see I am a confirmed fan of the 'push it out of the way' method of crafting. The card on the desk was my Valentines card to my Beloved Husband.


Valentines Day is a bit busy, as besides this, it is my Youngest sons Birthday, a nephews birthday, and also a work colleagues!

I will do a post on the Valentines card how to a bit later.

For my youngest son (he's 25 now, and passed his driving test last week), I converted a tag I had made before into a card. He is a big animal lover, cats in particular, and of course he adores Ambrose.


  The base card was overstamped with a Birthday words stamp, just randomly inked with the same Distress inks I used on the tag, then I matted the tag onto some black cardstock.

Posting at an odd time today, as we are back on shifts, and we do a permanent afternoon shift, 2 till10. Its a shift you either love or hate, but I love it- being a person who really does NOT do mornings. I seem to have loads more time to do stuff, too.


 Talking of work, I thought I would show you a picture or two of where we work & what we do- I say we as my Beloved Husband and myself work together too.Here's the proof! Beloved Husband & his toolbox.
 These are the sort of things we make- the bolts that hold aeroplanes together. So when you go on holiday, if your plane is an Airbus, its pretty likely that it has bolts in it that we made.


And here is Beloved Husband (Doug) at his favourite pastime- gaming.  I'm guessing this picture shows him playing Skyrim, which is a new one to him, its usually Call Of Duty or Battlefield. As it is with Youngest Son- I feel like I live in the middle of a war zone some days, lol.

Well thats a little portion of my world- my desk, my real job, and my Beloved Hubby. Pop over to Julias and show us yours, please. We love to come visit. Amazing how long the list has grown now- something to do with the Craft Stamper feature, maybe?
Something else I meant to post, have any of you seen Tims new direction with his '12 Tags of Christmas' idea?If not, follow the link on his name- its a really cool idea. Have a great week.

Tuesday 14 February 2012

50Th Birthday

I was taking some pictures off my camera for the next few posts, and found quite a few pictures  I had forgotten about. This one was for Beloved Husbands Aunt. The card itself is full A4 size, and is an Easel card.The numbers were cut out on the Silhouette,from white pearl card, and I am almost certain the cutting files came from UKScrappers. The face of the easel was covered with an embossed sheet of 12x12 card, and the letters were backed with a glittered vellum.The base is covered in a Happy Birthday foiled paper, from Craft Creations. A Tim rosette, and Nestie die cuts and some white organza ribbon  completed the card.

Saturday 4 February 2012

Craft A Scene- A Winters Scene

Hi folks, this is my first post for the Craft A Scene  DT, and the brief was to create two pieces with a winters scene. The second one comes along on the 19th Feb.

       After a few flicks through my Stampscapes stamps, I picked out the ones I wanted to use, then had a long think about how to create a wintry look, without just adding a load of snow. ( Which just so happens to be falling outside right now!).
 I was still struggling with how to look wintry, but decided to get started on the stamping, and hope for inspiration. This image very, very almost went into the bin- I had a complete disaster part way through- and the funny thing is, it was in the rescuing that I got my winter look.
I have quite a stack of brayered backgrounds, from when I was practising to get the hang of it, so I selected one that I thought could end up with the right look. It is a piece of Matt card, from Lavinia Stamps, brayered from the bottom with Stonewashed, Sailboat Blue & Denim Adirondack dye inks, and from the top down with Cool Peri, Purple Twilight, and a little Eggplant right at the top. Before brayering I added a circle punched from a post-it note to the upper half of the cardstock.
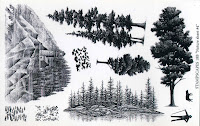
I used Versafine Onyx Black to stamp the images. Most of the elements of this picture come from Nature Sheet #6. I started with the Lakeside Cabin (147F) on the right, then stamped Lakeside Island (from Nature Sheet #4, The Lost Scapes) next to it, using a Stamp Positioner to marry them up. I placed them about 2/3 of the way down the card,just where the blue started to fade out. In the foreground I stamped Ledge (054F) twice, varying the angle slightly, then added Reeds Lge (068D) randomly. I used Water Pattern sm (231C) in the water area.  Final stamp was  Spooky Branch (273G) stamped reaching in to the picture on the left and upright on the right. You can see on the design sheet that the Ledge stamp is much larger than in my scene- I just used a small portion of it to give me a river/ lake bank. Equally, you can layer & stack it to give you a larger rocky area.

            Having taken the design sheet out of my folder to scan & show you, I could see similarities in my scene to the image on the sheet.

   So all was well up till now,  when I decided I ought to have a reflected moon in the water. Considered a few options, and decided to try 'stamping' a moon shape in Brilliance Moonlight White, using a round foam brush. My instant reaction was that it looked awful- it didn't work at all. And that I had ruined what was a promising picture to boot.I tried wiping the white ink off- that smudged and looked even worse. Next I tried cleaning that area with a baby wipe- now I had a patch with a different colour ink to the rest of the image. So, as a last resort, and as I had given up any hope of this image being usable anymore, I wiped over the whole image with the baby wipe- I had black ink coming off the image, as well as the white! Panic!!!! So now, completely stressed by everything going wrong, I folded a piece of plain white copy paper in half, put the image between the two layers, put a book on top of it (oh yes, it was curling up too!), put it to one side and went to cook tea.
 When I went back to it the following evening, I had no expectations of it being any use, and fully expected to be throwing it away. However, as you can see, what the baby wipe did was take enough ink away to give me a misty, ghostly look- perfect for mist/fog falling over a lake in winter. Trust me folks, nobody was more surprised at this than me. I had gone from scrap to perfect by sheer fluke.
The Lost Scapes #4
 Which does go to show that you should never consider anything past retrieving- no matter how bad things seem! I must be mad, but I decided to push my luck a little further- I have never used a white gel pen on images like this before, but I have loved the effect when others have done it. I found out my White Gelly Roll pen, only to discover it had dried up from lack of use! I have since managed to get it working by dunking it it warm water, but I purchased a new one from Joanna Sheen- which only took a couple of days to arrive, and sat down to work. As you can see I outlined the edges of the islands and added some white to the fir trees. I did the same with the Spooky branches, Reeds and the Rocky Ledge.  I used an Orange & Yellow gel pen to add a little light to the cabin windows. Finally I added a few squiggly white lines to simulate the moon in the water- very nervously, I might add- then trimmed the image down and matted it onto black, then onto dark purple cardstock.
 For the base card, I folded an  A4 piece of Gold card in half. The embossed background was made with a Cuttlebug folder, Snowflake.  I cut two strips of white card the width of the folder, and almost twice as long, embossed the image once, then turned the white card around and embossed the other end. The two lengths were then joined together with sellotape on the back, and cut down to fit the front of the card. A strip of pale blue ribbon covers the join. Mounted the image to the front, and breathed a sigh of relief, lol.
              I suppose this could be a Christmas card, which means I have actually managed to start them in January- so I only broke my New Years Resolution by a half (I wanted to do two Christmas cards a month).

  I hope you will join us over at Craft a Scene, I am looking forward to seeing the other DT's take on the brief, and what you all come up with.

Wednesday 1 February 2012

WOYWW # 139

The Call of the Wild

Well, thats one month gone already! and the first resolution (starting on Christmas cards) has fallen at the first fence, so I'm afraid that does not bode well for the rest of the year. Ah well. I will console myself with the idea that its the thought that counts, and my intentions WERE good, and apparently I was right about the old saying about good intentions.
Time to rejoin the world of desktop snooping, with all my blogging friends, courtesy of Julia Dunnit at The Stamping Ground again.

Just a quick card this week, and it really was quick & simple.Took me 20 minutes, I think. The Wolves stamp, Coronado Island, Shi & Mi, SJ151-JL, was stamped in Memento Black onto a grey marbled piece of card. Matted onto black, then white, and mounted onto a base card made from the grey marbled card. The Wolf Post stamp, same company, stamped onto a scrap of card, and added after the black & white ribbon. All the Coronado Island stamps are U/M now, which I like, but originally they had wood-mounted and U/M, and if you like realistic animal stamps, they have a gorgeous selection.
       Imagine is a Vap! Scrap stamp that I bought as a set of a dozen or so,mainly single words like Dream, Wish Believe etc. which I don't make as much use of as I should. I love wolves, as you have probably guessed, and Black & White is definitely my favourite colour combo.
  I chose the word 'Imagine', because if I had to choose to be something other than a human being in my next life, I would want to return as a wolf- and I do imagine what it would be like to run through the night, feeling the wind on your nose, ruffling your fur......


Back to reality, and E-bay got me again this week, as I found another Tim set, which I got for a fiver, so I was pleased at that.
 Finally, this weekend, the 5th, sees my first project for the Craft a Scene DT, so I shall be posting that on Saturday, as that should fall in with the time zone issue.
By the way, thank you Julia for the info on how to schedule a post, and to ShazinOz for e-mailing me with the answer. I had been doing ok up till the last bit, when I had been clicking on 'Save', instead of 'Publish'! So I am going to try again tonight- Wednesday is the only day I actually willingly get out of bed so I can come & link & post- every other day I drag myself out at the last minute- we have to be at work for 6 o'clock, so I give myself just enough time for a coffee & a couple of cigarettes before leaving home. I can carry on getting my caffeine levels up to normal when I get to work :).
So Wednesdays routine is: get out of bed, go downstairs, on the way past my craft room, turn my PC on, go down to the kitchen and put the kettle on,(we have an old Victorian 3 floor house and our bedroom is on the attic level) go back up & put my password in, go back down and make the coffee, go back up (with the coffee) and post and link. I'm knackered before I get to work on Wednesdays. 
OK, fingers crossed all I shall have to do in the morning is Mr Linky! See you all later, have a great day!!!

An End of an era

An end of an era

I write this with a broken heart, that only time can heal My beautiful, wonderful wifelet Shaz (Silverwolf) passed away peacefully in the ea...